Showing posts with label DIY. Show all posts

Friday, May 30, 2014

DIY : Trend Shirts Tutorials

Guys, what is up? So before we started I remind you, start from Sunday, June 1st until Friday, June 6th, this blog will closed/inactive, but don't worry, I'll be back on Saturday afternoon, June 7th. I'll join Final Semester Exam. So guys, I'll show today, tutorials how to make trend shirts. So when you wear this, you'll look so gorgeous and you are the most update and stylish and swag people in the world *to much talking
So come on, let's get started....

1. Lip Crop top
Materials :
1. Crop top
A little bit expensive if you buy the crop top may be. Why don't you make your own crop top? Tutorial? Check out my older post
2. Stencil paper
3. Scissor
4. Iron

How to make:

  • Open your Computer/PC/Laptop and open the internet, find your favorite mouth/lip clip art and print it on the stencil paper.
  • Cut the mouth/lip clip art neatly
  • Place the mouth, where you want to be
  • Iron the mouth so it's stick on the crop top. 
  • Voila, You're done.. 
2. Front Tie shirts 
The most easiest

Materials :
1. Shirts
2. Scissor

How to make :
  • Take the shirts and the scissor
  • Cut this part -> and tie it
  • Done!!!
3. Bow back shirts 
Materials :
1. Shirts
2. Fabric, the patterns/colors of your choosing 
3. Fabric Glue
4. Scissor

How to make :
  • Take your shirt, cut the back of the shirts like that picture
  • Take your fabric
  • Cut the fabric shaping the rectangle and glue at the edges of the rectangle and stick at the back of the shirts
  • Cut another rectangle with small size and the same patterns/colors
  • Circular the middle of the rectangle with the small size rectangle and glue it so it's shaped bow
  • Done!!
4. Love Elbow Long Sleeves apparel
Ha, this not the shirts but this is something cute that you could wear. 


Materials :
1. Long Sleeves apparel
2. Fabric the color of your choosing
3. scissor
4. Glue/ thread and needle
5. Marker *not permanent

How to make :

  • Take your long sleeves apparel and the fabric 
  • Cut the fabric shaping love
  • Take your long sleeves apparel and mark with marker where your elbow is. 
  • Glue/Sew the love to your long sleeves 
  • Done!!!!! Aye!!!!
5. Flower Crop Sweater 
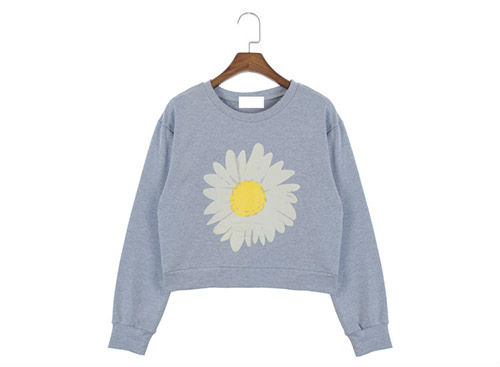

Materials:
1. Fabric paints, the color of your choosing, buy only 2 colors
2. Sweater, the color of your choosing
3. The flower printing
4. Sponge

How to make :

  • Take the sweater and the flower printing
  • Paint the sweater with sponge and fabric paint, following the shape of the flower printing
  • Done!!!! You're done with your cutie flower sweater 
Thanks for viewing, telling me what's your favorite, and follow me on:
Twitter : @DellaCNapitu
Instagram : @dellachristina

Ilysm guys, bye-bye
xoxo, Della

Wednesday, May 28, 2014

DIY : Colorful Phone Cases


Hi guys, I thought that I'm sick today, or I just being lazy to do everything, or I have thinking a lot, or I have many problems, yeah, we couldn't said that as problem actually. I have this little thing that always disturbs me every seconds of my life, for 3 years or even 4 years, I'm not really sure. I know, that's sounds "to much" but, in fact, that's happen to me. Well guys, I'm told everything to you, and I hope this is only happen to me, cause it's hurts. Well I just told you my problem once, my toes nails stabbing the flesh and it's hurts me. Okay stop, I'll not gonna discuss about this anymore, let it be my own problem. May be Jesus gave me temptation. Yeah, I just believe in Him.
So guys, for today post I wanna to be showing you guys, How to spice up your phone with your phone cases. And these phone cases are easy to make and very cheap. So let's get started..
Materials :
  • Simple phone cases I suggest you to buy the cheap one, and buy 1 transparent case, and buy 2 simple cases
  • Stud & I'm not sure what is actually the name of the white ball that shimmering on the second picture, it's might be the fake pearl or the ornaments of tiara, well I dunno 
  • Colorful Pattern Papers
  • Glue, Penknife and scissor
  • Yellow/Gold/Glitter Gold acrylic paint and of course the paint brush
  • Colorful tape
How to make :

1. Pattern paper Case Decoration 
  • Put the transparent phone case, scissor, glue, penknife and the pattern papers
  • Take the transparent phone case and the pattern papers, and then cut the pattern papers following the shape and the size of the case
  • Glue the inside of the case and stick the pattern papers
  • Cut the pattern paper in camera section with penknife so that will be neat
  • Let's be creative, you could combine a lot of pattern papers or change the pattern papers once a week
  • Done!
2. Studs & shimmering phone Case
  • Let me remind you to buy the studs which do not have the sharp edges behind but it's flat
  • Take the phone case, acrylic paint and the brush, glue, studs, and the shimmering thing, I still dunno the name of that things
  • Take the phone case and then paint it with acrylic paint, I suggest Gold/Gold Glitter Color, but you could use the colors of your choice, wait till it dry
  • Glue the studs, the shimmering one, or anything that you want to add to spice up your phone case
  • Wait till it dry and you're done
3. Colorful tape for my phone
The most easiest
  • Take the phone case, tapes and the scissor
  • Tape the phone case neatly with your colorful tape, or pattern tape and using scissor cut the tape
  • Cut the tape in the camera section or another part like camera with scissor or penknife
Thank you for viewing, I'll see you later on the next post #bad #mood
sorry for bad quality picture...
xoxo,Della
Twitter : @DellaCNapitu
Instagram : @dellachristina

Tuesday, May 27, 2014

DIY : Swag and Stylish Shirts/Jeans


Hi guys. What is up?, Della is here to tell you one of the crazy and amazing DIY. so for my most amazing post for today, I'll give you six DIY : Swag and Stylish Shirts/Jeans. Wow, I'm in love with these, cause these DIY  are so amazing, cheap and of course so easy to make. Comment below, tell me what is your favorite , mine is number 3, well i dunno why i like that one, but the others are amazing too.
Okay so what are we waiting for, Come on let's get started :
Before we begin, let's prepare all the materials
Materials:
- Fabric paints
You'll need to buy fabric paints, and the colors are : White, Black,Purple, soft pink, blue, orange or the colors of your choice but I recommended that colors to you
- Cardboard / Flat Pedestal [as usual]
- Shirts, such as, Crop tees [Tutorial? Check my older post], black plain tee, white plain tees, tank top or the shirts of your choice, i recommended that.
- Old Jeans
-  Studs, or something else, that could spice up your DIY
- Stiff paint brush, remember "the stiff one" and the paint brush
- Masking Tape
- Sponge
- Sticker paper for clothes
- Scissor
- Penknife

Okay that's all, and let's we make it
1. Galaxy Cross tank top/sleeveless shirt

  • Lay the tank top/sleeveless shirt on the flat pedestal and put the cardboard into the tank top/sleeveless shirt. 
  • Take the Masking tape and tape the tank top/ sleeveless short forming the cross.
  • Take the fabric paint, with colors : Black, purple, soft pink, blue, orange & white 
  • Paint the cross start with black, and then add the purple and white colors, give some blue and soft pink colors, and give a little orange, and the last dot the cross with the paint brush and white color, do not dot the cross to much
  • Wait till it dry and remove the tape
  • Voila, you're done
2. Chanel fashion logo prints on a simple white crop tee

Before we started make your own Chanel logo printing, draw it or print it on the sticker paper for clothe.
Cut the unnecessary part, at the picture on the side, can be said, cut all the white part, also the middle of that logo, to make you easy, use penknife. so the remaining part only the logo. Stick the logo on the simple white crop tee. If you're draw the logo on the cardboard, cut the logo so it's forming Chanel logo, it's used to be the mold. Take the stiff paint brush and the black fabric paint and lay the mold on the simple white crop tee and start paint that, after you're finish rid of the mold and dry it. Hard to explain actually 

3. Love mustache Shirt
  • Make the mold shaped like the picture : L --- *mustache* --- O --- V --- E 
  • Lay the shirt on the flat pedestal and put the cardboard into the shirt
  • Place the mold on the shirt and tape edges of the mold, so the mold cannot move
  • Take the stiff paint brush and take the black fabric paint 
  • Paint the shirt follows the shape of the mold
  • Wait till it dry and remove the tape and the mold neatly 
  • Taaadaaa You're done 
4. Studs on the jeans
  • Lay out your supplies : Studs & Jeans 
  • Cuff your Jeans 
  • Choose a pattern of your studs
  • Stud the cuff, follow the pattern, how to stud it? Usually the back of the studs is sharp enough so you just push the stud on the cuff and it will be pierce.
  • Repeat on the other cuff
  • You can add some colors to your jeans, or bleach that or ripped that or whatever to spice up your jeans
  • Voila you're done 
5. Catwang Crop tee 
  • Take the sponge and cut the sponge shaped like a Catwang/Cat face
  • Take the paint brush and the black fabric paint
  • Paint the sponge with the small paint brush and black fabric color
  • And Stamp on the shirt
6. Swag Moon black top
  • Make the mold shaped 4 circles 
  • Take the stiff paint brush and white fabric paint
  • Start with first row, Draw the moon from the crescent moon facing to the left and progressively full 
  • Second row, Progressively full until half moon facing to the left
  • Third row, draw full moon until half moon facing to the right
  • Fourth row, draw the moon, fewer and fewer until the most little crescent moon facing to the righ
Phew, i'm tired enough to write all of this. And that's all i could showing you guys for today DIY, I hope you guys get it/understand and i hope you guys enjoy this post and this post might helping you guys. Thank you for viewing my blog, Ilysm and bye-bye
xoxo,Della